How to change iPhone 6 Battery?
Unscrew the bottom two screws

The simplest step is to unscrew it directly with a screwdriver. Don’t use too much force. After all, it is a high-end electronic product.
Use a sucker or a tool to pry it up

It doesn’t matter if you don’t have a sucker, you can also do this with the pry board that comes with the battery. Although the pry board is simpler and more professional, as far as I know, the average repairman doesn’t use a sucker, because if the sucker isn’t good enough or if you push it too hard, it can detach the screen.
Using a skid board is different. A small slit can remove the screen perfectly.
Pry up the screen

Here we need to pay attention to: after prying up the screen do not force up, because the screen line and so on the petitioning is connected with the fuselage.
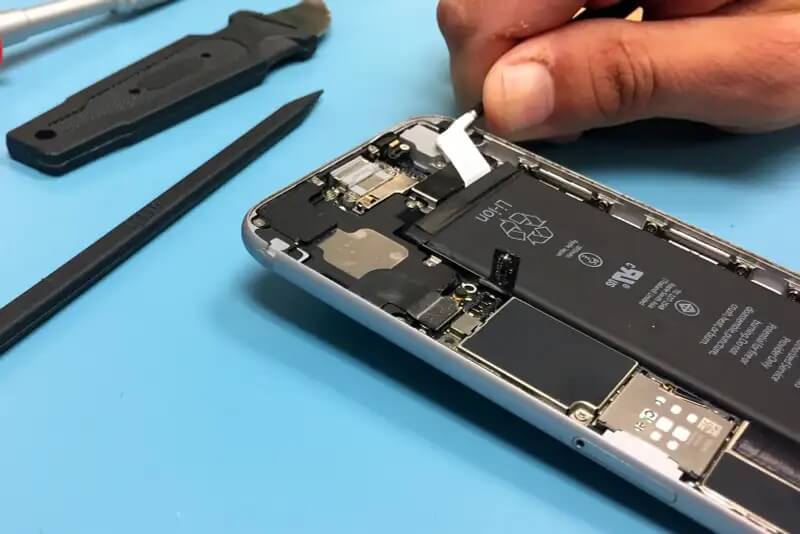
Battery wiring position

The picture above shows the battery wiring position. You can see it after you unscrew it.
After unscrewing off, use a plastic crowbar to pry off the connector of the battery cable from the motherboard.
Pay attention to only use force on the cable outlet, do not damage the outlet on the motherboard.
If you pry the socket, you might just break the socket.
Screen ribbon cable

Can choose not to remove, but do not remove easy to damage the motherboard or screen improper operation.
The five screws here are of different sizes. Please take them off and remember their respective positions. Misplacing the screws during installation will cause permanent damage to the iPhone motherboard.
Clean the lower wiring as the battery wiring.
Replace the battery

Back to the subject, this is battery gel. Use your fingers or blunt tweezers to pull it up, and be very careful when operating near the battery – piercing a lithium-ion battery can cause a dangerous chemical reaction and start a fire.
Pull up the battery glue
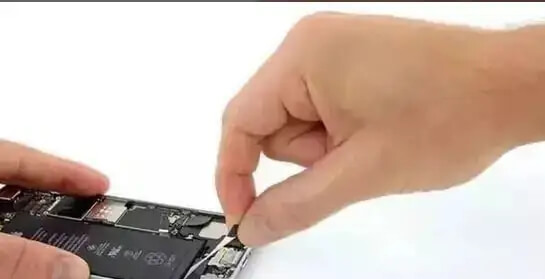
Pull out the battery adhesive and try to keep the adhesive strip flat during operation. Bending the adhesive strip will cause the tape to stick together and break instead of pulling out completely.
To avoid breaking the tape, be careful not to let the tape get stuck by the vibrator or any part under the battery.
Be sure to pull it out steadily and at a uniform speed.
After all the battery glue is pulled out, the battery can be taken out with discarded card
Glue the new battery glue to the new battery

Take out the new iPhone 6 battery and stick the new battery glue on it, then leave part of the top of the battery glue and press it on the battery. The new battery will be considered replaced.
Equipped with batteries

Finally install the battery, we must pay attention to the battery wiring position, do not install anti-Austrian.
Then buckle the line, install the cover plate and screw it, and restore it.
After all the steps, the skilled ones should finish it in ten minutes, and the unfamiliar ones should spend 20 minutes. After the change, the sense of achievement is overwhelming!
With a full battery life, the phone will still be able to fight for quite some time.
In the meantime, just take it one step at a time and don’t worry. Everything will be easy.
The steps for replacing the battery on the iPhone 6s are basically the same as on the iPhone 6, so I don’t want to repeat them here, so just follow the tutorial.
It’s worth noting that the screen only has four top cables when it’s taken apart, down from the iPhone 6’s five.
Again, make sure you turn your phone off before replacing the battery.
How to change iPhone 7 Battery?
The iPhone 7’s battery replacement is more cumbersome than its predecessors because opening the iPhone’s display can damage the waterproof sealant.
The cleaning of this glue is very troublesome. I suggest you use small scissors to carefully cut off this sealant. If you use professional tools, you need to spend an extra 800 yuan to buy an iOpener, which is completely unworthwhile.
In addition, there are many steps to replace the battery, such as replacing the battery to remove the barometer and so on, so please be careful, do not ignore the tutorial steps, otherwise, the change is not good is a small matter, if the mobile phone is broken that is a big thing.
Position of bottom screw

The familiar formula still tastes the same, and the location is the same, but be careful, too much force can damage the bottom frame, or even puncture the battery in the past.
Move the screen

We have mentioned the problem of sealant before. If you pry open the screen, you can see a glue in the connection between the frame and the screen. Generally speaking, the sealant itself will lose its effect due to lack of stickiness after a long time of use.
So it’s recommended that you use small scissors or sharp objects to break them.
In addition, don’t try to remove the screen completely, as several fragile cables are still attached to the iPhone motherboard.
Battery wiring position

Compared with previous generations, the battery wiring position of iPhone 7 has been upgraded. The screws on the cover plate have been upgraded from two to four, so please mark the position of the screws respectively and do not install the wrong ones after replacing the battery.
IPhone 7 battery wiring location

Use the tip position of the skid board to pry up the battery wiring, pay attention not to pry straight up and down, need to carry plug, otherwise your mobile phone wiring interface may be damaged, when the time to repair can be a big trouble.
The iPhone 7 is wired at the top

The top wiring of the iPhone 7 has also been upgraded, making it less cluttered than before, with just two screws to hold it in place. It’s easy to unscrew it and put it away.
Please also be careful when removing the wiring.
IPhone 7 barometer location
After the above steps, the screen and body are officially separated, and the next step is to remove the battery.
Remove the barometer before removing the battery. If you skip this part, you may damage it.
The iPhone 7’s Taptic Engine location

This is where the iPhone 7’s Taptic Engine module is located. This Taptic Engine module is basically the vibration module, which is a feature that Apple first used on the phone. It needs to be removed and put away.
IPhone 7 battery glue


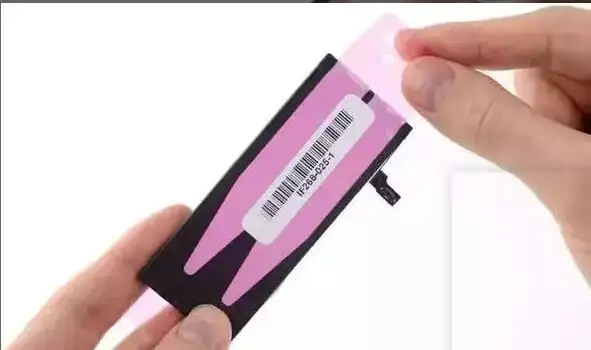
After all the steps are finished, we will come to the main battery. First, lift the battery glue and then pull it out. It should be noted that because the iPhone 7 is relatively new, there may be a little resistance when pulling the battery glue, so you must be light and uniform when pulling out.
Install the battery glue

